Welcome to my Blog!

Hi there, nice to have you visiting! I'm Heidi and this is the blog for Heidi Bears. Here is where I post all the happenings in my work and daily life. Here and there you'll find info on things that have caught my attention as well as the odd tutorial. I hope you enjoy your visits. I love to have feedback, so leave me a comment!

Wednesday, March 31, 2010

Heli Fun!

Hi and happy Wednesday :)

Today is a quick post, as it seems Blogger may still be experiencing some difficulties (?), and my pics have taken forever to upload :(

These are pics taken on a helicopter flight with my dear friend Pete (who is a fantastic pilot). We flew over the Johannesburg area, up to Hartebeespoort Dam.
It was my first heli flight and I was a bit nervous, but enjoyed every minute once I was up in the air! What an experience :) Thank you Pete!


Gorgeous fields of cosmos flowers...growing wild...


Soccer City.


The Johannesburg General Hospital...I spent many loooong years here! Strange to see it from the air!

Hartebeespoort Dam.


Well, tomorrow will have something new...
Sleep well,
Love ,
Heidi :)

Tuesday, March 30, 2010

Easter cookies: A recipe you just have to try...


Happy Day! Blogger is working...

Last night I tried in vain to do a post, as Blogger seemed to have a few glitches... but here I am back today with the next installment of the travelling Easter Tree.


I wondered what to do next to decorate our little tree, and decided on the Easter cookies, because it allows the kiddies to do something as well...and of course eat up everything afterwards!


Easter Cookies


These are truly the most delicious cookies I have ever tasted :) I have spent what seems like forever perfecting this particular recipe and am so happy to share it with you...


Ingredients:


5 cups cake flour

3 heaped teaspoons baking powder

1 and a half cups of fine castor sugar

350g butter

real vanilla essence/paste/extract (I used vanilla paste 3 tblsps, but you need to decide how strong your vanilla is an adjust accordingly...that said, I tend to put quite a lot, so that you can smell the vanilla in the final cookie)

4 Tblsps golden syrup

2 extra large eggs


Mix all your dry ingredients in a bowl.


Cut the butter into small squares, which makes the mixing easier in the food processor.


Mix the blocked butter into the dry ingredients until you have a light and crumbly mixture. I just do the mixing in my Kenwood, it's easier than doing it by hand....


In a separate bowl, mix together the eggs, golden syrup and the vanilla.


Pour the liquid ingredients into the mixer slowly while letting it run.


The resultant dough shouls be easy to work, not cracking easily but not sticky. If you have got sticky dough, you can just add a small amount of cake flour until the consistency is right.


Roll out onto a suitable surface using a rolling pin. I have chosen an egg shaped cookie cutter, but also cut out some small cookies using my girls play-do cutters (wash these well before use...) These smallies make the best cookie cutters, and they come in such cute shapes and sizes (adorable, little things). Use a flat spatula to pick up the cut-outs and place on a baking tray that you have sprayed well with non-stick spray.

Bake at 160 degrees Celsius for approximately 10 minutes. You really need to watch them , because ovens vary and 160 degrees in my oven may not mean 160 degrees in your oven!! They are ready to be taken out when they are a lovely golden brown, but still a little moist on the inside.


Afetr you have taken them out of the oven, use a plastic straw to make a small hole at one end. The cookie will still be warm inside and its's easy to make a neat round hole...This will be for the ribbon to go through.


Wait until the cookies have cooled down completely on a wire rack and then decorate to your hearts' content :)
Hope you enjoy!
Our Share the Love Heart Swap is filling up nicely...
Please would Kate, Curley Monkey and Cute Little Thing email me with addresses, blog addresses and email addresses...I need to send you your partner's details :)
Have a wonderful Day!
Lots of Love,
Heidi :)

Sunday, March 28, 2010

Fabric Easter Cross for Palm Sunday: a Quick Tutorial

If you would like to join in...please email either Linda at lindadawkins@mweb.co.za or myself at heidibearscreativeblog@gmail.com
We would love to have you share the love... :)

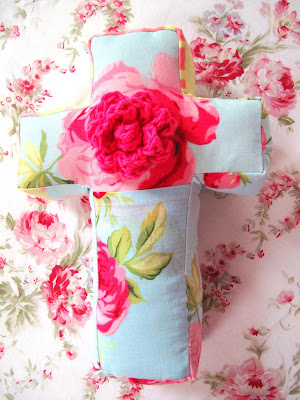
Palm Sunday Fabric Easter Cross


A Heidi Bears design (copyright)

Hiya folks!


A super quick tutorial for this special Sunday: Palm Sunday.


It's a simple fabric cross with a pocket in the front to put your palm leaf...


The crochet rose is optional, but the fabric whispered in my ear that it liked the bright rose, and wanted to be friends...in addition the rose is symbolic...


Requirements:

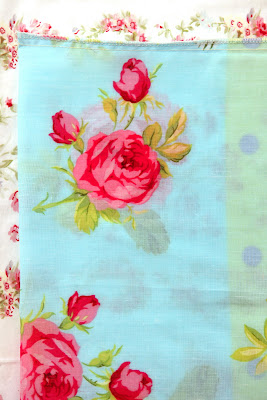
I bought the fabric at a small non-descript linen shop that had a special on loose pillow cases, so I bought a whole bus load :) I like it, it's kinda Cath Kidstonish... I used a pillow case piece of fabric with bits left over for some patchwork item...

Sewing machine

Iron on vilene

Sewing thread

Scissors

Pins

Merino fleece stuffing

Crocheted rose


Choose your fabric, and cut out your pattern from the paper it was printed on. Decide where you are going to lay your pattern, as you may want certain pattern elements to be at the cross junction. I wanted the rose to be in this area, so I laid the pattern on two bits of fabric that were mirror images of each other.

Iron your fabric so that you have a nice smooth surface to work with...


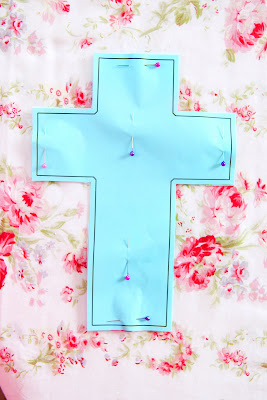
Pin the paper pattern to the fabric carefully, cut out. Since your fabric has been folded so that there are two layers, you will have cut out two crosses.


Two crosses cut out, mirror images...


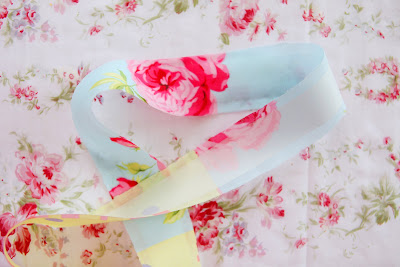
Cut out a long piece of fabric (I cut out from the long edge of the pillow case), I would say about a metre long, and interface with the iron on Vilene for strength and hold.


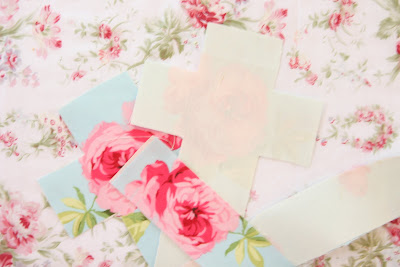
Iron Vilene onto both cross pieces.


Cut out the pocket piece from the fabric. Fold over and sew up the top edge, to stop it from unravelling. Then sew the pocket to the front of the cross as shown above.

Then start sewing the long fabric piece to the edge of the back piece of the cross, all around, making sure that you strenghthen the corners. When you get to the area where you started sewing, cut off any excess fabric from the strip and sew the two ends together. You should now have a 2D cross shape. Sew up the front piece of the cross to the long strip/cross you just made. Make sure you leave a small area open for stuffing.


Turn the cross inside out. Push all the corners out so that they are nice and square. Stuff firmly with the fleece and then mattress stitch the opening closed. Sew on the crochet rose...and you are done!


This was just a quick mini-tutorial...hope it makes sense... :)


See you tomorrow,

Lots of Love,

Heidi :)

Super easy Crocheted Rose Tutorial

Hi all!

A quick post , hopefully another will follow later today...


Crochet Rose Tutorial
Requirements:
DK weight yarn (I used Rowan's DK Handknit Cotton)
Crochet Hook size 3.75mm
Tapestry needle for sewing up
Scissors
Pattern:
You are going to chain 40 stitches. Each rose petal will be formed by 5 crochet stitches: SC,DC,TC,DC,SC, in that order. You will work these 5 stitches into every alternate chain stitch, ie skip a chain stitch between petals.


I hope that you can all follow the pics!
I am off to have a helicopter ride with my friend Pete, will be back later folks!
Lots of Love,
Heidi :)